MICO LIGHTER REPAIR KIT LINK
https://www.ebay.com/p/Vintage-Mico-Electric-Lighter-Repair-Kit-Element-and-Mica-Disc/1031383045
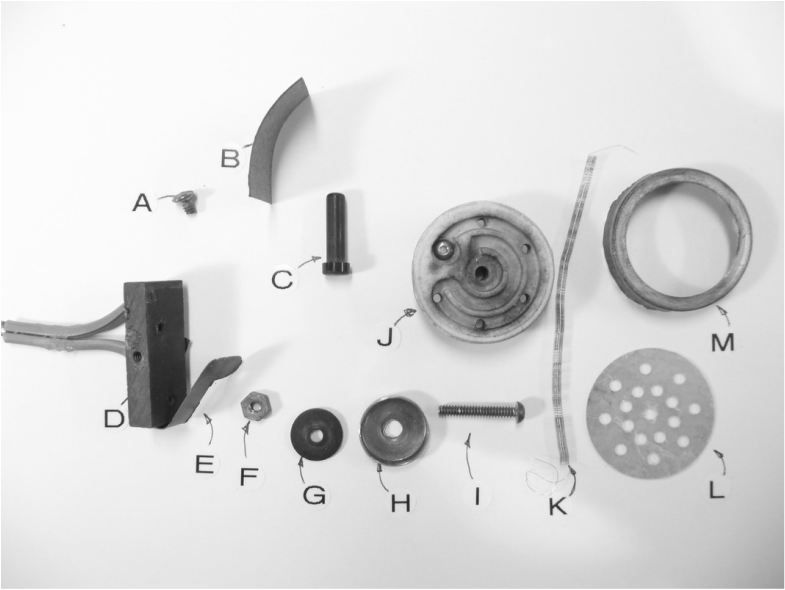
MICO LIGHTER REPAIR KIT INSTRUCTIONS
1. Remove the small screw (A) from the back of the lighter.
2. Remove the internal parts and the old power cord.
3. Note the location of the insulator strip (B) on the upper left side of the lighter body.
4. Unscrew the ceramic element (I) from the insulator block (D).
5. Pry-off the bezel (K)…un-crimp in 3 places and remove the old mica disc (J).
6. Remove the center screw (H) noting the location of the contact disc (G) and the insulating washer (F).
7. Remove the old nichrome wire and note how and where the wire makes contact in 2 places.
8. Clean any debris or rust from the center screw (H) and the ceramic element (I).
9. Thread the new nichrome wire through the side hole in the ceramic element (I) and attach the free end of the nichrome wire to the center screw (H)…..wrap it around the screw (H) a few turns.
10. Insert the center screw (H) in the center hole of the ceramic block (I) and add the contact disc (G) trapping the new nichrome wire under the contact disc (G). Add the insulating washer (F) and nut (E)…then carefully tighten.
11. Lay the new mica disc (J) on the face of the ceramic element (I) add the bezel (K) and re-crimp in 3 places.
12. Solder on a new power cord to the terminals on the insulator block (D).
13. Install the black button (C) into the top hole. Depress the contact spring under black button (C) and install the rebuilt assembly. Be sure the insulator strip (B) is in place (upper left hand side).
14. Install the small screw (A).
CAUTION: Be sure all connections are done correctly. Check thoroughly before plugging in. Run a continuity check between the plug and lighter body.
https://www.ebay.com/p/Vintage-Mico-Electric-Lighter-Repair-Kit-Element-and-Mica-Disc/1031383045
MICO LIGHTER REPAIR KIT INSTRUCTIONS
1. Remove the small screw (A) from the back of the lighter.
2. Remove the internal parts and the old power cord.
3. Note the location of the insulator strip (B) on the upper left side of the lighter body.
4. Unscrew the ceramic element (I) from the insulator block (D).
5. Pry-off the bezel (K)…un-crimp in 3 places and remove the old mica disc (J).
6. Remove the center screw (H) noting the location of the contact disc (G) and the insulating washer (F).
7. Remove the old nichrome wire and note how and where the wire makes contact in 2 places.
8. Clean any debris or rust from the center screw (H) and the ceramic element (I).
9. Thread the new nichrome wire through the side hole in the ceramic element (I) and attach the free end of the nichrome wire to the center screw (H)…..wrap it around the screw (H) a few turns.
10. Insert the center screw (H) in the center hole of the ceramic block (I) and add the contact disc (G) trapping the new nichrome wire under the contact disc (G). Add the insulating washer (F) and nut (E)…then carefully tighten.
11. Lay the new mica disc (J) on the face of the ceramic element (I) add the bezel (K) and re-crimp in 3 places.
12. Solder on a new power cord to the terminals on the insulator block (D).
13. Install the black button (C) into the top hole. Depress the contact spring under black button (C) and install the rebuilt assembly. Be sure the insulator strip (B) is in place (upper left hand side).
14. Install the small screw (A).
CAUTION: Be sure all connections are done correctly. Check thoroughly before plugging in. Run a continuity check between the plug and lighter body.